Saturday 31 May 2014

How to create a YUM repository using an ISO image

In RedHat Linux like any other Linux distro, you can create a repository from an ISO image for patching and adding RPM’s on your system. The basic steps are mount the ISO image on a loop device, create the repo, then the last step is to configure your yum repository configuration files to point to the correct location.

Benefits of creating a local YUM repository:
  • You have a repository on your own machine
  • You don’t need an internet connection to install packages on you machine.
  • Your local repository is consistent and consistent for package installation or re-installation.
 Configuring YUM:
 
First of all you need to have an installation media, either a DVD or an iso image.
Mount these media on any directory on your machine.
 
Command for mounting iso image:

  • $mount -o loop -t iso9660 file.iso /mnt/iso
Now we have to copy the contents of inside the installation media to a directory of our desired location which we want to make the YUM repository.
Command to do this is:
  • $cp -rvf /mnt/iso/* /yum
 The asterisk sign (*) after the directory name suggest tha all the content is to be copied.  The above command shows that all the contents inside the /mnt/iso directory is to be copied under /yum directory.

once the copying is done we need to create a file with .repo extension.

 Now making a .repo File :

  •  $cd /etc/yum.repos.d
  •  $vi rhel.repo
[Repository]

name=yum-repository
baseurl=file:///yum
gpgcheck=0

Once you are done with your .repo file. You are good to go with your YUM utility. Just run a simple command to check whether it’s working or not.

  • $yum list

    If every thing goes fine you will see a list of packages in your YUM repository.If anything goes wrong then ping me, I’ll be more than happy to help you.
     

    Till then keep reading, keep sharing.


Thursday 29 May 2014

How to Lock Folder without any Software (100%) works

Most of us have private data. Not all of us have a private computer to keep that data. So, we just end up with other people viewing that data. Although password protecting software do work, it is almost useless to hide private data with these software.

Hidden folders do not work as anyone can use Folder Options to make a hidden folder visible. So, we need an alternative way to create hidden password protected folders which only we can access. And that is exactly what we will learn in this post.

Have you ever had the need for a protected folder, but didn't want to use Window's basic security? Then create your own!

To use this trick, follow the instructions given below:-

  1. Open Notepad.
  2. Copy and paste the exact code given below in Notepad :-

##########################################################
cls
@echo off
title Folder Locker
IF EXIST "Control Panel.{21EC2020-3AEA-1069-A2DD-08002B303­­­09D}" GOTO UNLOCK
IF NOT EXIST Locker GOTO MDLOCKER
echo Folder Created.
:CONFIRM
echo Are you sure you want to lock the folder? (Y/N)
set/p "cho="
IF %cho%==Y GOTO LOCK
IF %cho%==y GOTO LOCK
IF %cho%==N GOTO END
IF %cho%==n GOTO END
echo Invalid Choice.
GOTO CONFIRM
:LOCK
ren Locker "Control Panel.{21EC2020-3AEA-1069-A2DD-08002B303­­­09D}"
attrib +h +s "Control Panel.{21EC2020-3AEA-1069-A2DD-08002B303­­­09D}"
echo Folder Locked.
GOTO END

:UNLOCK
echo Enter password to unlock the Folder :
set/p "pass="
IF NOT %pass% == Password GOTO FAIL
attrib -h -s "Control Panel.{21EC2020-3AEA-1069-A2DD-08002B303­­­09D}"
ren "Control Panel.{21EC2020-3AEA-1069-A2DD-08002B303­­­09D}" LOCK
echo Folder Unlocked Successfully.
GOTO END
:FAIL
echo Invalid Password!
GOTO END

:MDLOCKER
md Locker
echo Folder created.

GOTO EN
:END

#########################################################################

3. Change the password. Where it Shows Blue Text i.e. "Password", change it to your                  desire password.
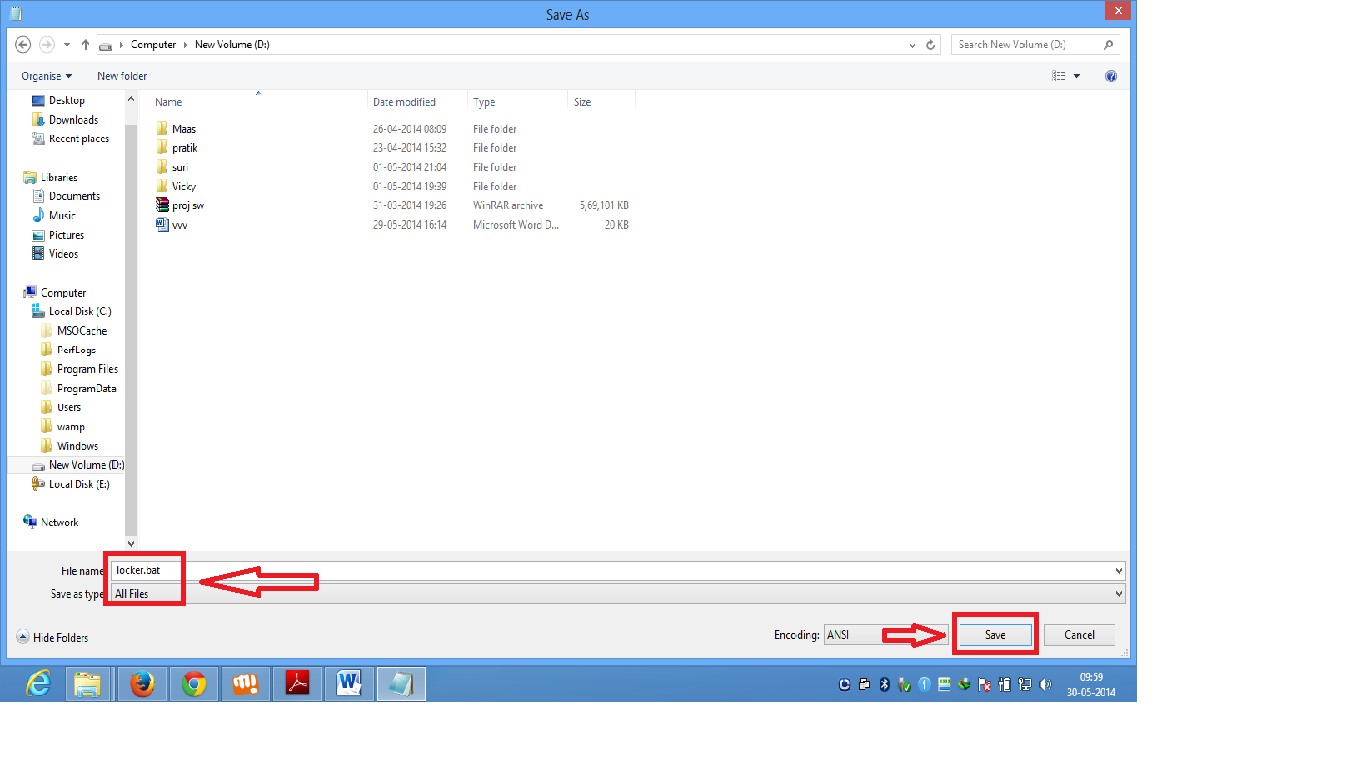
   4. Save the file with name "locker.bat" and as all types and click "Save".
    5.  Run the "Locker" file by double-clicking it. You will get a folder named Locker.
    6.  Move all the things you want to hide and again run locker.bat.
    7Double click on the locker.bat again. A Command Prompt will open, it will ask you to                lock the folder. Type Y then press enter.


    8. Done. No one can access your folder without the password.


        How to Lock Folder without any Software(100%) works


If you face any problem using this trick, you can write a comment and I will do my best to help you.